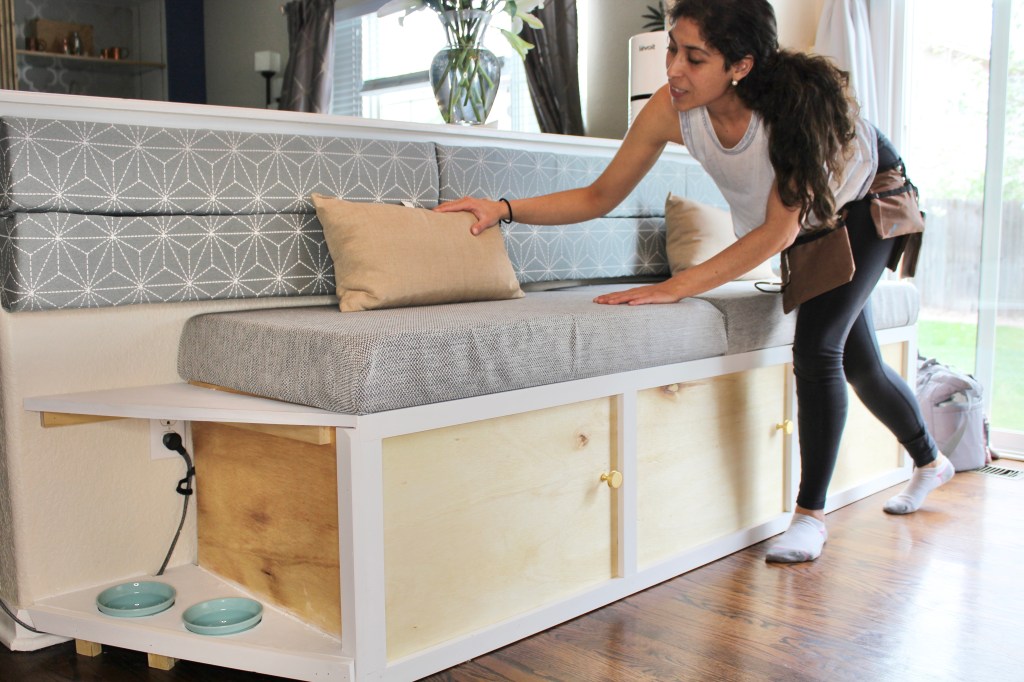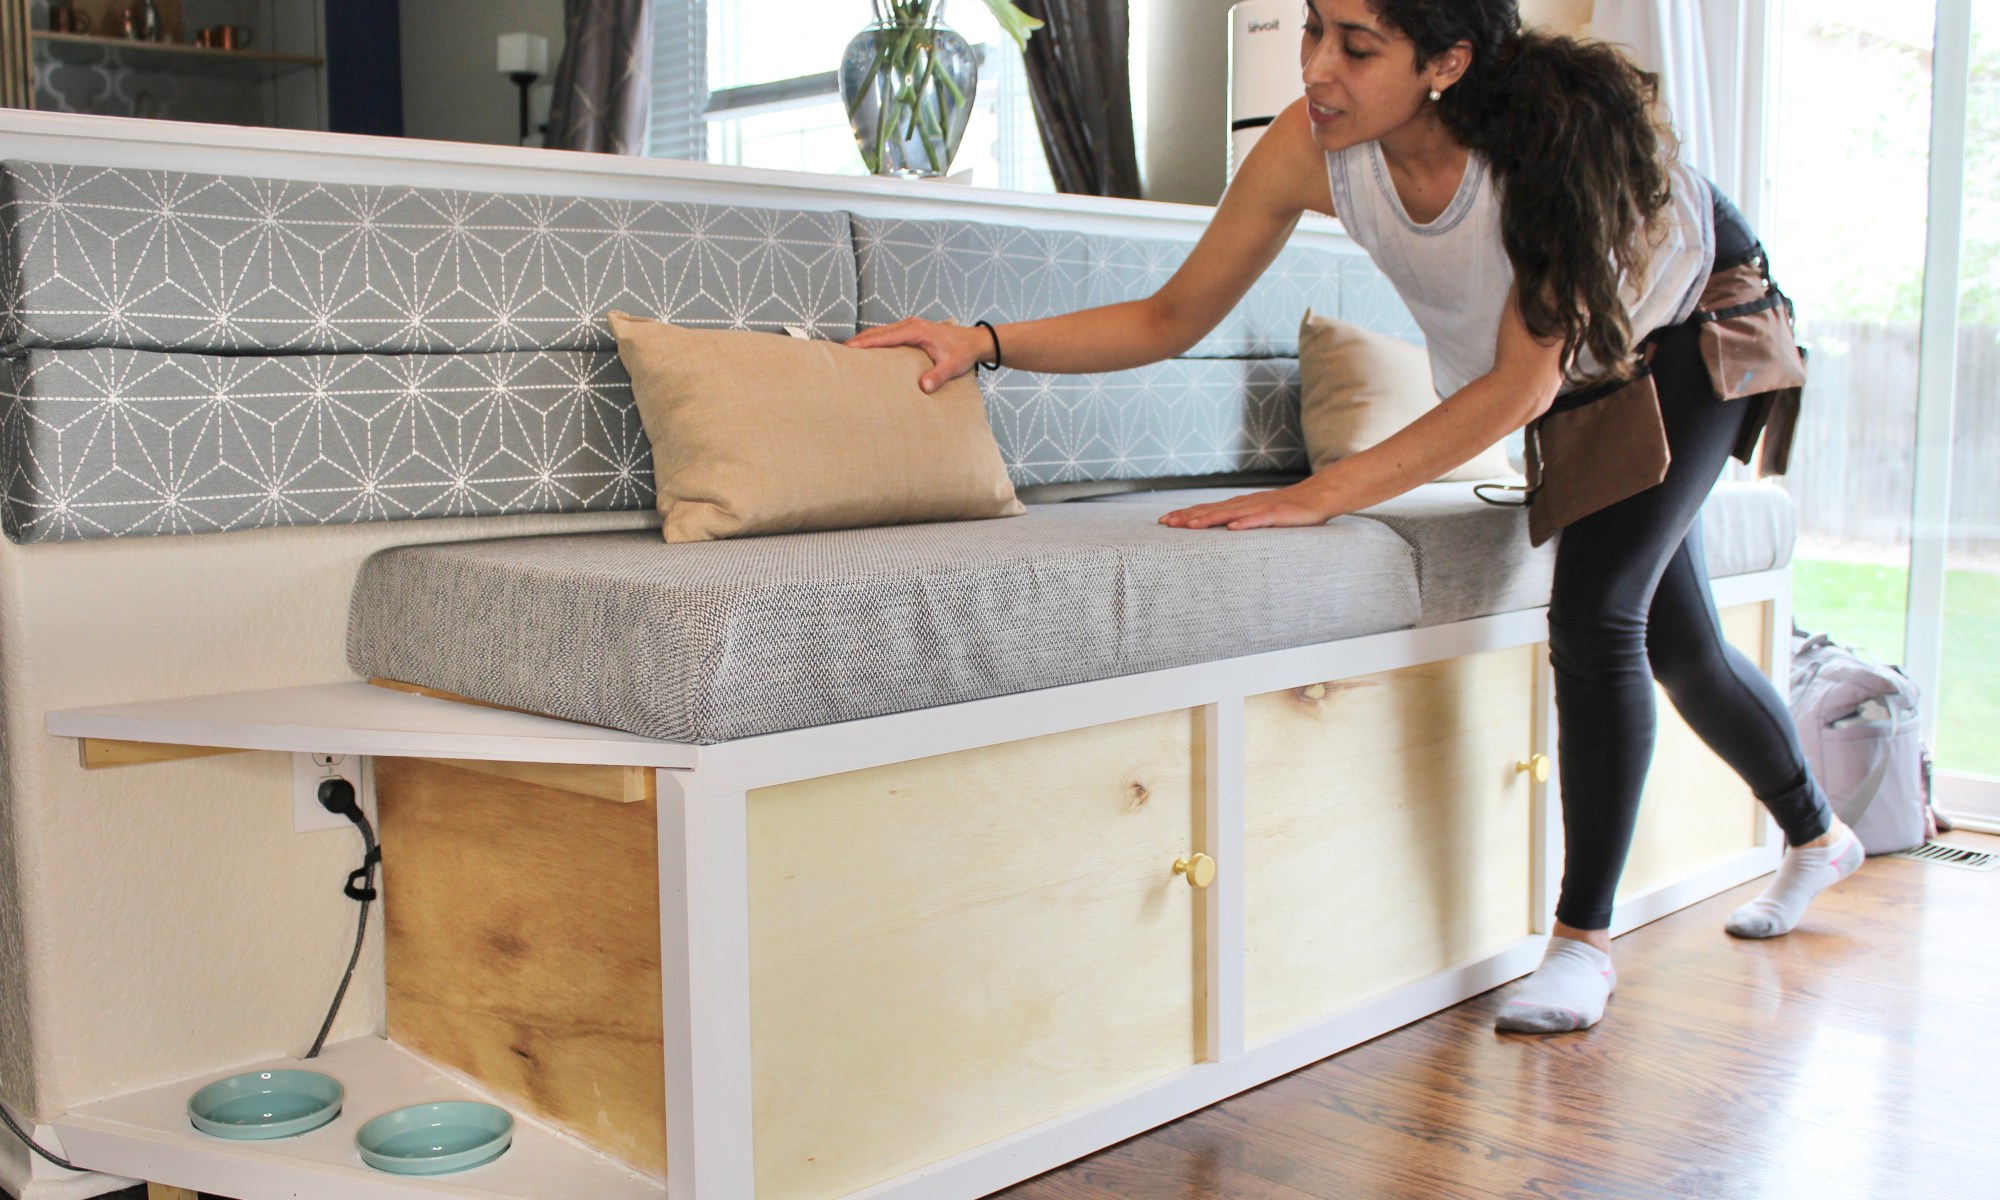
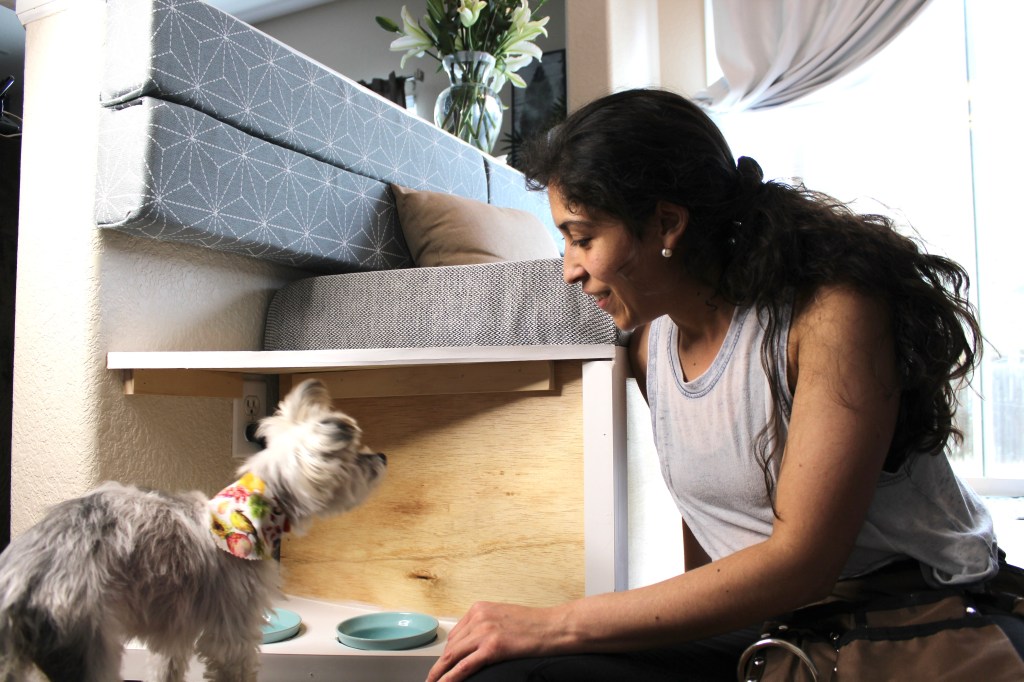
Bonus Feature: Built in Dog Bowl Holder
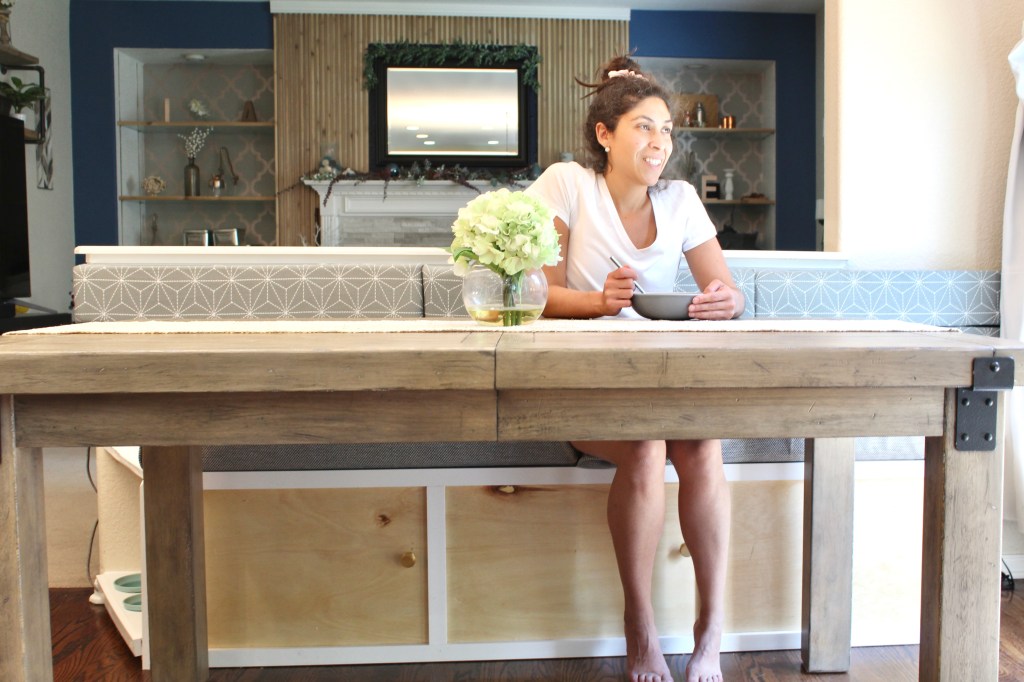
Our little guy is growing fast and soon he won’t need a high chair but then he we won’t have anywhere for him to sit and eat. Family meals together are important, and I want to keep them as part of our routines as he grows but I am not excited about lugging our food and plates to our dining room for every meal. Also I have selfishly taken over our dining room as my craft space.
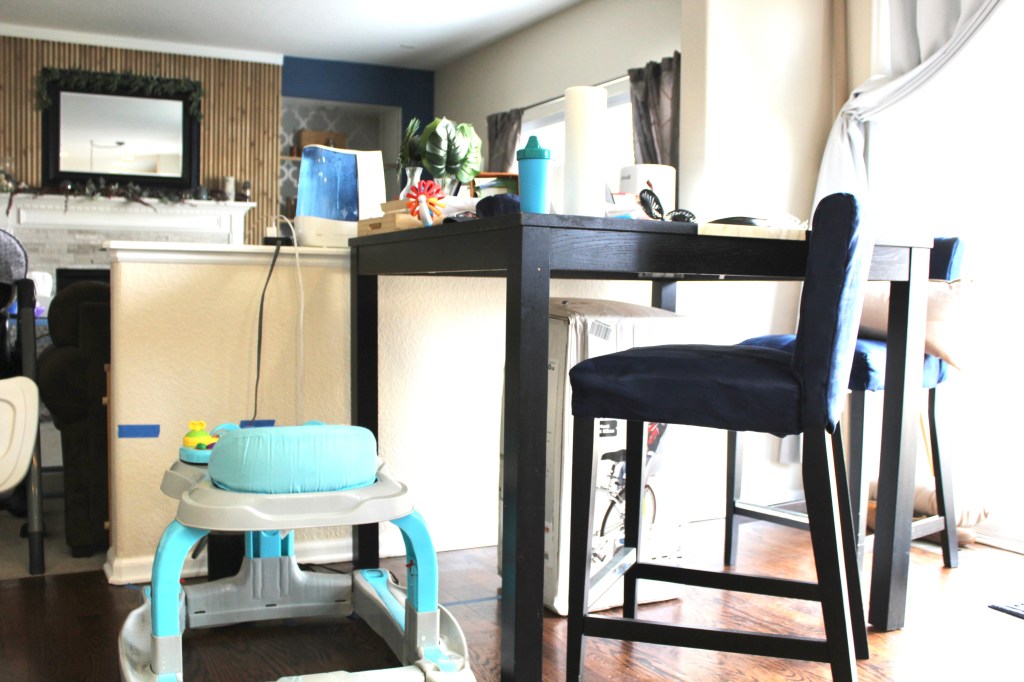
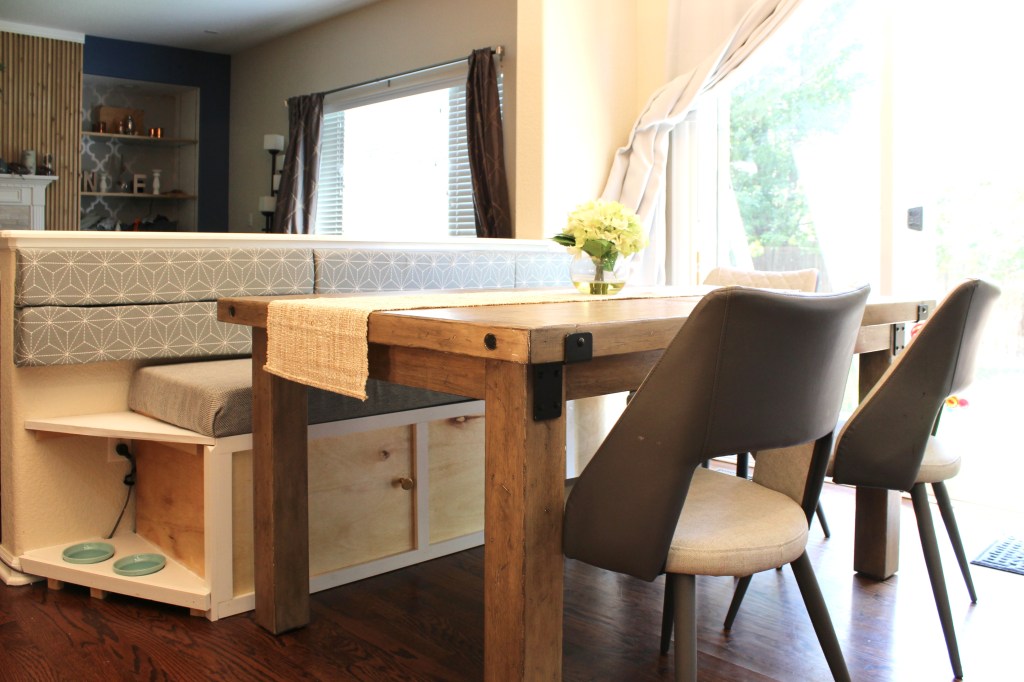
I decided to solve this problem and I am going to build a Breakfast Nook Banquette in our kitchen.
Eat in Kitchens are a highly desired feature with today’s home owner and I can see why. They are a great alternative to a formal dining room for todays on the go family especially for quick meals.
I also built a Pet Bowl Holder into the Banquette for even more function.
Supplies:
- 4-6’ Common Boards for the back cushions
- 2-2×4 BCX Plywood Panels for the seat and shelves
- 2-2×4 Underlayment panels for the bench face
- 3-1x2x8 trim pieces for the bench trim
- 8-2×3-8ft lumber to build the bench
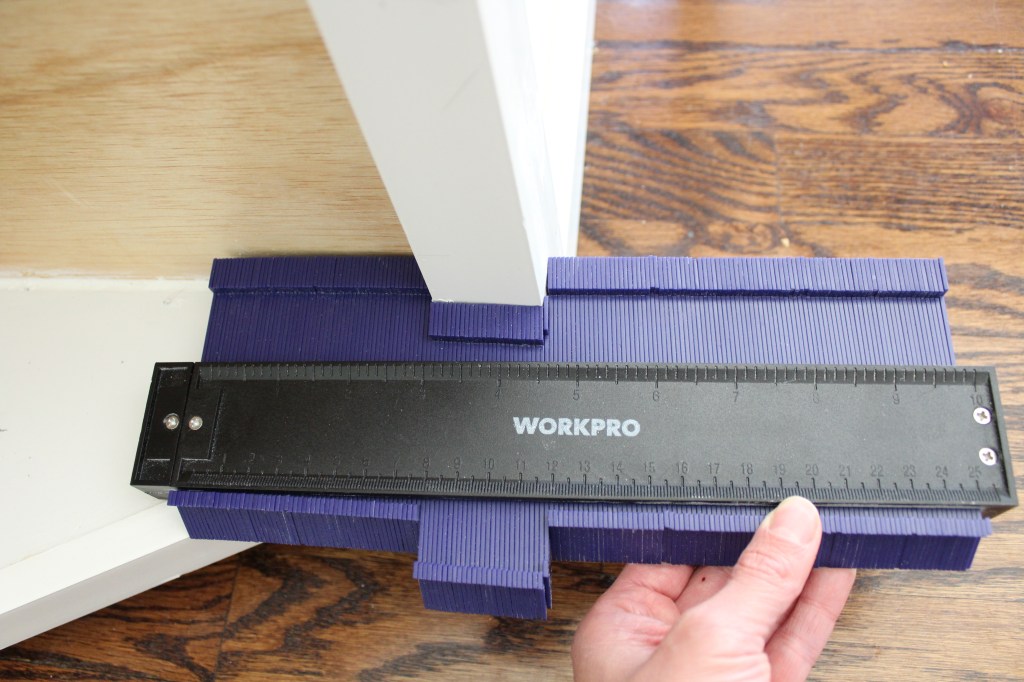
- Contour Guage to make custom notches
- Kreg Pocket Hole Jig Kit to build the bench
- Wood Glue
- Edge Banding
- Paint
- Fabric and Foam for cushions
- Flush Mount Interlock Brackets
***Bonus Feature Dog Bowl Holder
- Router with Plunge Base
Measure
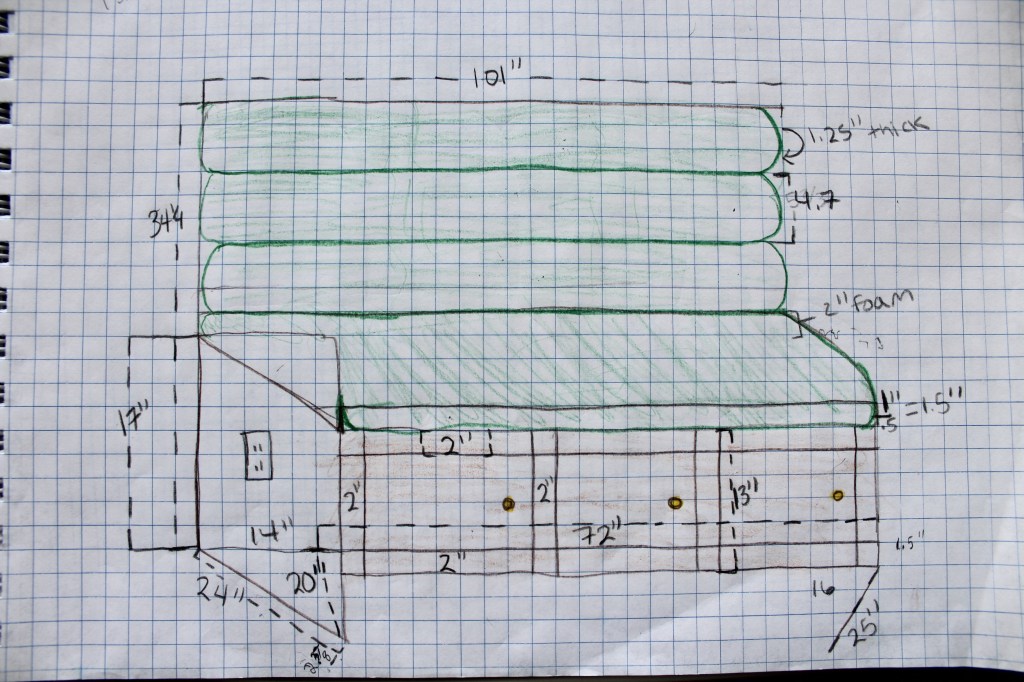
The first step I did was measure the space to determine how big we wanted the bench to be. Here are all the measurements I came up with
Make the Bench

I started by making the bench frame. I cut all of my 3x4s into these sizes:
- 4×72’’ for long pieces
- 12×14’’ for all the small lateral pieces
- 8×15.25’’ for all the small horizontal pieces
Drill Pocket holes
I used pocket holes for this project. I have always wanted to learn this technique so I decided to try it for this project. This technique seems to give more stability and it hides the screws so you don’t have to go over them later with wood filler. I drilled the holes using the pocket hole kit. I used vices to hold the wood frames together while I drilled.
Drill Holes
I put together the frame and drilled screws in I made with the pocket holes. The pocket hole jig kit I used came with a long drill bit so than that made it easier to get the angled pocket holes that I made.
Add Panels
I bought these underlayment panelsand cut them to fit the bench face. I used a nail gun and nailed them onto the frame

Add Trim

I bought trim to be a border for the face. I measured the trim to make 3 squares on the face of the bench. I cut the trim pieces and nailed them onto the panels.
Make the Side Shelves
I wanted to make triangle shaped side shelves instead of square in order to avoid bumping my knee every time I walked past it. This is a busy walk way so I know that is bound to happen. Also, sharp corners would not be good for the little guy.
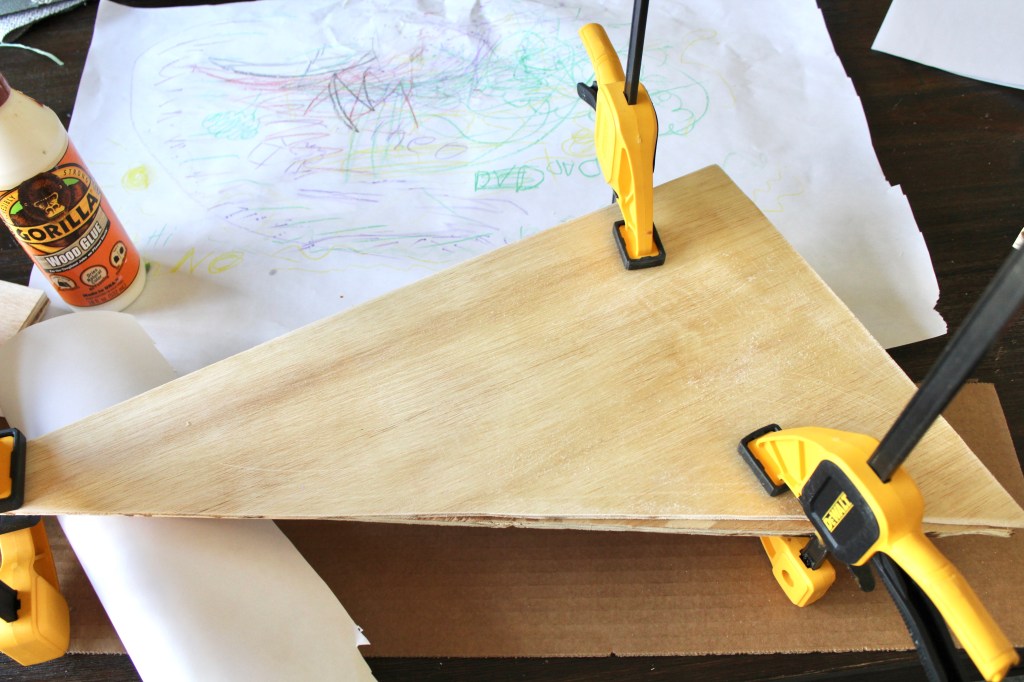
Top Shelves
I cut two pieces of plywood for each shelf and glued them together so that it would be thicker and more studier. It was surprisingly hard to cut a triangle with my table saw but after a few tries I got enough decent pieces to make the shelves.
Painting and Edge Banding
I ironed on eged banding to where the shelf edge was visible to give it a more finished look. Then I spray painted the shelves with Behr Matte White Spray Paint

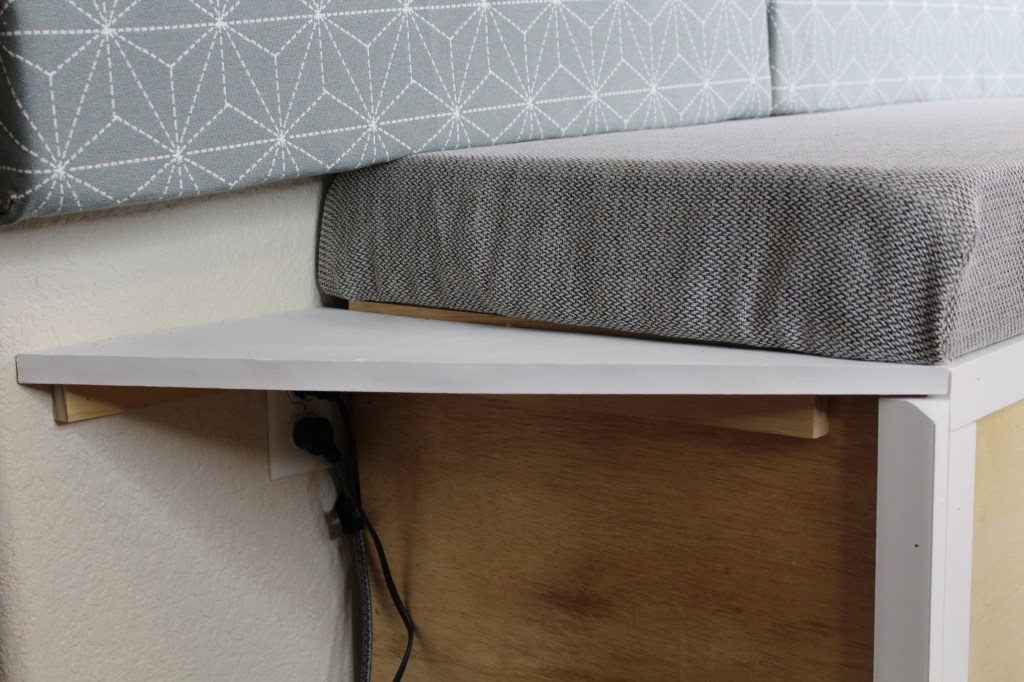
Add Mounting
I traced where I wanted the shelves to go on the bench and I nailed in small wood slats underneath where I wanted the shelves to sit. I nailed the shelves into the support slats so they are secure.
**Bonus Feature Bottom Shelf Pet Bowl Holder**

The main space issue we have with our kitchen is where to put Mileys dog bowl and water. Its always in the way and she is very picky about where she will eat her food. My solution is to create a dog bowl holder in the bottom shelf.
Cut Shelf Shape
I cut the plywood again into triangles for the shelf shape. I used my contour gauge to draw the shape of the moulding onto my new shelf to cut the notch. Now it will slide in perfectly. I also made a notch for the cords to go through.
Make the Dog Bowl Holes
I used a dog bowl frame set I already had and traced the circles on the shelf as my guide.

I used a Dewalt Router with plunge attachment to cut the holes. This was a lot easier than a Jigsaw because it was easier to cut in a circular motion. The plunge attachment allowed me to start in the middle of the board to make the circle. I will do more tutorials in the future on this.
Sand and Paint Shelf
Mount Shelf
I added my mounting slat and stapled the shelf in place.
Add Shelf Details
I cut and glued a small wood support and mounted it underneath the shelf for more stability.
I glued and nailed on some trim molding to the face and caulked the seams for a more finished look.
Make the Cushions
Now I was ready to start on the cushions.
Make the Seat cushions
I decided I wanted two cushions to go on the seat.
Cut the Boards
I first cut two sections of Plywood for the two seat cushions in 22’’x 36’’ pieces.
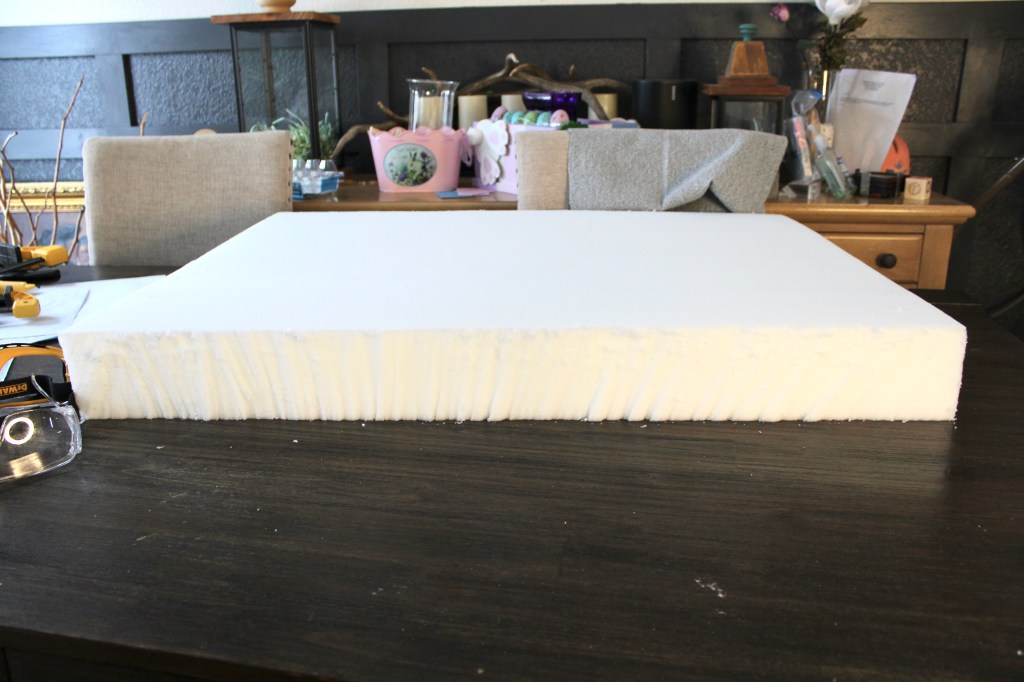
Cut The Foam Padding
I measured how much I needed on the bench and marked it. Then I cut the foam cushion with a hand saw to the shape of the seat. I have seen people use an electric hand saw so if you have one that would probably be best. The foam was pretty thick and a little hard to get through. I cut 2 large sections for the seats.
Glue
I glued my cushions to the boards with some Gorilla Spray glue and Wood Glue
No Sew Upholstery Wrap Fabric
I wrapped my fabric around each cushion and boards and stapled it with a staple gun.
Corner Folds
The hardest part of the no sew upholstery was folding the corners. I tried a couple different ways but here is how I found the best way to do it.
- Grab one side and fold into the other
- Overlap the opposite side over the corner of the wood and staple.
Make the Back Cushions
I wanted a total of 6 cushions on the back. 3 Rows By 2 Columns. I used common board and cut then into 6 pieces each 34” by 5.5”
I cut the foam into 6 sections for the back the same size as the boards.
I repeated the same steps from the seat cushions and glued the foam onto the boards and wrapped them with the fabric and stapled.
Attach Back Cushions
I used flush mount interlock brackets to attach the cushions to the wall. These brackets are good for heavier picture hangers, furniture connectors and headboard wall mounts.


Added Faux Pulls
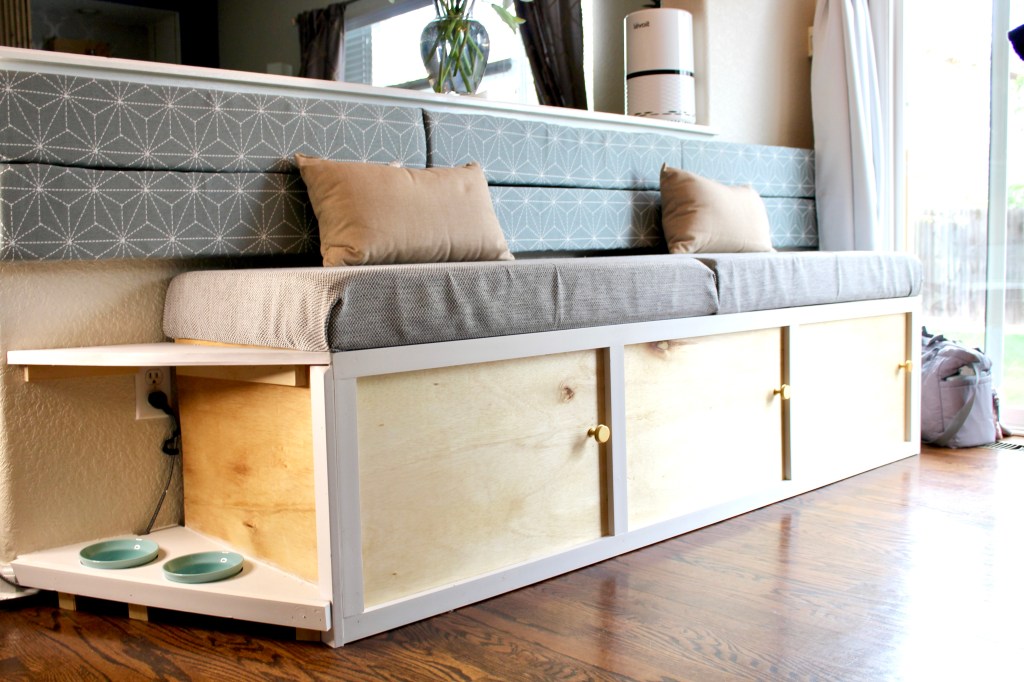
I found these gold knobs at The Home Depot and screwed them as a decoration since there is not actual drawers. I think it adds some visual dimensions.
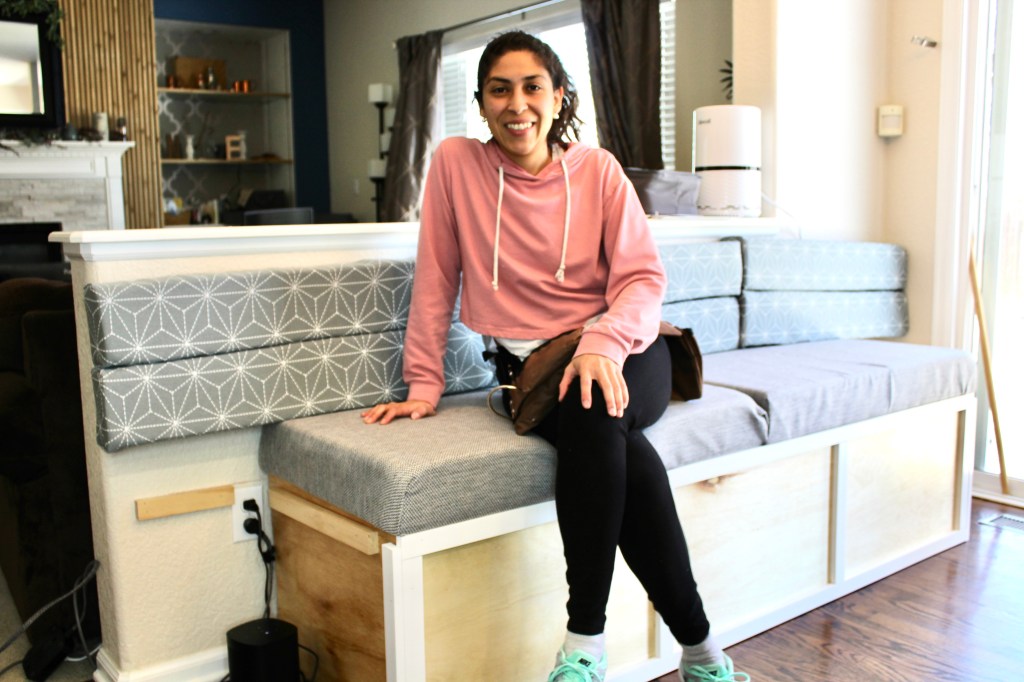
Here is how it all turned out