Grid Wall/MDF Wall Project Guide
One of my favorite design projects to do is creating accent walls. A unique accent wall can be an amazing back drop for instagramable moments. Fun and creative accent walls can be perfect for vacation rentals and even in your home. In our world of video meetings a cool background is nice to have as we are seeing more and more into each others homes with remote learning and working.
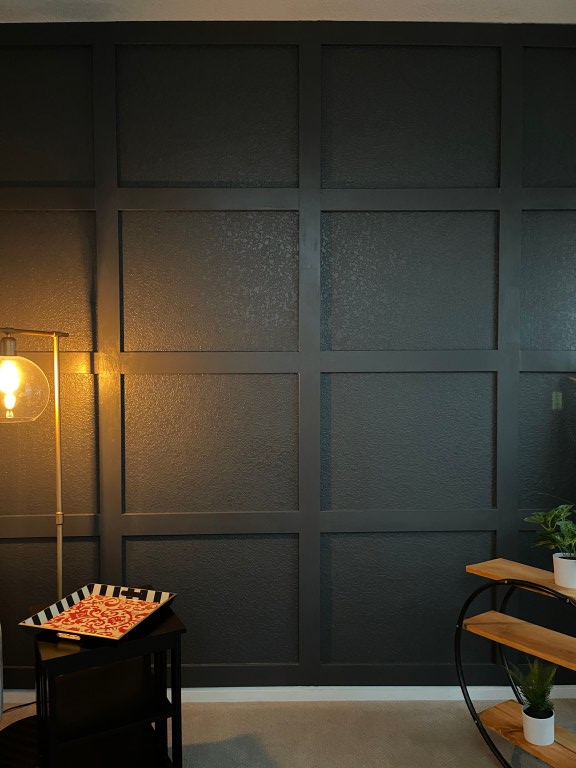
The Grid Wall in our home was pretty easy to put together. It makes a bold statement, our decor pop and pictures look great. We even got compliments on it from the HVAC people that came out to fix our A/C last summer.
Here is how we made it.
- Common MDF board 3.5in wide 1 in thick 8 ft long (we used 14 boards)
- Charcoal Grey Paint (Behr Ultra Interior Semi Gloss Paint and Primer in one)
- Liquid Nails
- Nail Gun and nails
- Wall Repair Patch Kit
- Paint Tarps (We used 3. You will need a lot of space on the tarp to paint the MDF boards)
- Level
- Saw(Or you can have them cut the wood for you at hardware store)

Step 1(Decide how many Rows and Columns)
The best way to decide how many Rows and Columns you want is to draw it out on grid paper to scale to see how it will look. In our example we did 5 columns and 4 Rows

Step 2 (Measure)
- Measure the width of your wall. In our case it was 160”.
- Take the width of the board ( ex. 3.5”) multiply by how many boards you will have. We had 6 boards in our example 3.5”x6=21”.
- Subtract that number from the total width 160”-21”=139”
- Once you have that number divide by the amount of columns you want. We had 5 columns 139”/5 columns=27.8in
- This number will give you the space in between boards vertically

Do the same for the height.
- Measure the height of your wall. In our case it was 96in.
- Take the width of the board ( ex. 3.5in) multiply by how many boards you will have. We had 5 boards 3.5”x5 boards=17.5”
- Subtract that number from the total height 96”-17.5”=78.5”
- Once you have that number divide by the amount of Rows you want. We had 4 Rows 78.5”/4 Rows=19.6”
- This number will tell you the space in between boards horizontally

Step 3 Determine How Many Boards to Buy
Once you have done all the measurements you can determine how many of the MDF boards you will need to buy.
Here is our example:
We bought (Common MDF board 3.5in wide 1 in thick 8 ft long)
Vertical: In our case we needed six 8’/96” Boards for the vertical piece
Horizontal: 27.8”(space calculated for between vertical boards) x 5 Rows x 5 columns=695”/96” boards=7.3 Boards
Total Boards needed to buy was 6(vertical)+7.3(horizontal)= 14 Boards. I rounded up to have extra.
Step 4 (Cut the Boards)
This step you can have done at hardware store for you if you don’t have a saw. We used 6 of the full 8 ft boards for the vertical pieces so these ones we didn’t have to cut. We cut 10 of the 27.8” boards for the horizontal piece
Step 5 (Sand and Paint your Boards)
You can sand the edges of your boards where they were cut so you have smooth edges. Paint all your boards that you are going to use first on your tarps. Make sure to get all the sides that will be showing. Make sure they all have the same amount of coats for a consistent look. It is important to paint the boards before you put them up because it’s a lot harder to paint them when they are already on the wall
Step 6 (Paint the Wall)
Paint the accent wall. We painted the wall after we put up the boards but it makes it a little easier to paint it before. Either way works though.
Step 7(Glue boards with Liquid Nails and nail to wall)
Start with the Vertical pieces. Use liquid nails and squeeze it on the side of the MDF board you want to face towards the wall. You can start from either end. Place the first Vertical piece to wall on one end and secure with Nail gun on the bottom, top and middle. Once you have your first vertical piece up measure the number you calculated in step 2 to get the distance to place the next vertical piece.

Repeat this step with the rest of the vertical pieces.
Use the level to make sure that your boards are straight as you go.
Then do the same with the smaller horizontal pieces in between the vertical.
Step 8 (Patch any Gaps)
Use the wall patch kit and go through the joints where your vertical and horizontal pieces meet and patch any gaps you see. Let dry.
Step 9 (Touch Up Paint)
Paint over the patched sections. At this point you should be able to see if there are any other places that need paint touch ups. You can paint any gaps you see.
Now you can add your furniture pieces and decorate!